
Examining ADA Restroom Requirements: The foundation for accessible design
Universal design. Accessible design. ADA design. These terms all convey images of unattractive, institutional spaces. Yet, they are vital to life, and so are the people that design, operate, and maintain these spaces we rely on for our daily life.
Accessible public restrooms are integral for any commercial space and are not just for the physically challenged or the aging. However, in addition to meeting today’s rigorous ADA standards, builders, architects, interior designers, kitchen and bath professionals and remodeling contractors must also consider other factors including sustainability, efficiency, hygiene, “well design,” durability, as well as aesthetics. And in the post-COVID world that also means going hands-free as much as possible.
When it comes to designing an ADA restroom, the 2010 ADA Standards (Chapter 6) is the go-to source for making sure to get the basics done right. Many states and local municipalities have also adopted the 2017 ICC/ANSI Standards for commercial buildings. While the 2010 ADA Standards and the 2017 ICC/ANSI Standards are similar in many regards, they sometimes differ in the contexts of scope and technical requirements.
Keep in mind that when undertaking a new construction project or planning to make physical changes to an existing building and the prevailing governing body uses both sets of guidelines, adhere to the more stringent requirements found in either the 2010 ADA Standards or the 2017 ICC/ANSI Standards. Plus, it is important to note that some states guidelines are ”stricter” than others. Please check with your local guidelines to be sure that all requirements are being met. [See Beyond ADA sidebar for other ADA sources.]
The most important details when it comes to ADA compliance design are spacing and measurements of several elements within the restroom.
ADA Design Details
Stylish design and accessibility design are not mutually exclusive. They can coexist within a design vision to create a refreshing, inclusive restroom. Thoughtful selections and creative use of existing space and materials will help. It is all in the details.
Usually, when you consider accessibility design, the needs of people who use wheelchairs is forefront. Wheelchairs vary in size and design and the use of motorized scooters continues to grow. Like wheelchairs, scooters are available in a myriad of sizes. Yet, today’s accessibility standards fail to address these trends and their ramifications on bathroom designs.
Designing an ADA restroom, however, goes beyond accommodating wheelchairs. For example, the needs of people who have sensory disabilities such as blindness or deafness and those who use devices such as canes and walkers. The needs of these individuals may require the elimination of protruding objects from your design and may necessitate the inclusion of a fire alarm that has strobe lighting.
Additionally, consideration for the people who tend to individuals with disabilities, including parents and opposite-sex caregivers, is necessary when designing ADA restrooms. These considerations, for example, have given rise to “family” bathrooms in places like malls and other establishments frequented by consumers who have a wide range of needs.
Defining Terms
Before examining the guidelines within ADA for restrooms, it is important to understand the interpretation of the Codes involved, the requirements of the builders and owners, architects and engineers, all play a role in achieving the desired result. Often, perhaps more often than anyone cares to admit, intense disagreements emerge as to the interpretation of what is and what is not a problem or an issue. These interpretations can often stall a project’s schedule and at times side track it unnecessarily.
No one knows this better than ADA expert James V Vitale, AIA, LEED AP, CASp, RCI. Vitale has been involved in advocating for ADA issues for many years, and is often called upon as an expert witness in these matters.
According to Vitale, projects involve a series of managed tasks/topics related to achieving a specific result/goal. The solution involves issue identification and successful resolution and implementation.
“The methods and means for doing this vary from project to project,” he points out, “but a lot of confusion arises when the terms ‘issue’ and ‘problem’ are used relating to projects. They are very close in meaning. Unless you define your terms, things will go South.”
“Look at it this way,” he continues. “Issues are typically resolvable, whereas problems may often be viewed in a negative light. You see, the word ‘problem’ is often connected with the word ‘solution’ in a person’s mind.”
The goal Vitale emphasizes is to identify the issues associated with an initial goal to be met.
“People’s word choice matters – a lot,” he says. “The word choice plays an enormous role is facilitating understanding. By defining your terms, the timing and amount of responses can be minimized.”
Mis-understanding can be avoided if definitions are discussed and set at the beginning of every project, but especially ones that incorporate ADA thinking.
ADA Standards
A good starting point when designing for a wide range of abilities, disabilities, and other characteristics, are the ADA Standards. These guidelines about restrooms include the floor space, the toilet height, the space under the sink, the type of faucet used and even the placement of the toilet paper roll!
Basically, you want to make it as easy and pain-free as possible to use the space. Typically, products are designed to be most suitable for the average user. In contrast, products that are designed according to accessibility are designed to be usable by everyone, to the greatest extent possible, without the need for adaptation or specialized design. For example, a door that automatically opens when someone approaches it is more accessible to everyone, including small children, workers whose arms are full, and people using walkers or wheelchairs.
Here are some of the most common ADA bathroom layout guidelines when designing an accessible restroom:
Note: There are separate ADA guidelines for children restrooms. See alternative measurements in tables indicated in each section where ADA makes distinction.
Clear Floor Space
Maneuvering Space – The disabled should be able to easily maneuver to the toilets and sinks within the restroom or stall. For a 30” x 48” wheelchair, a clear floor space of at least 60” diameter is required, allowing a 180-degree turn. In some cases, the available clear space can be supplemented by open space under a fixture to meet the minimum requirement or a T-shaped turning space that is 60” in length with a 36” width.
Mounting Heights – To make accessories such as dispensers and dryers accessible, their operable parts must be located no higher than 48” above the finished floor and no lower than 15”. They should also be fully recessed where possible into the wall to prevent injuries.
Equipment Accessibility – Equipment and accessories should be designed for a forward or parallel approach, as well as for both left- and right-hand access.
Signage – The standard requirement for ADA signs is be on the opening side of the door and should align the reading characters at 48” to 60” above the ground surface. The baseline of the tactile character should measure 16” from the highest tactile character. The tactile character should be used as a compliant sign. As for existing restrooms that are not compliant with ADA standards, there should be a sign that indicates the nearest restroom that is ADA compliant.
For a more detailed explanation of signage requirements, see sidebar Follow the Signs. To assist with ADA restroom design, the sidebar also includes corresponding product information from ADA product manufacturers.
Stall Requirements
Doors
Door Swing – Doors must swing out and at least 36” wide to accommodate wheelchair-bound people and be self-closing.
Door Handles and Latches – Door handles must be easy to operate with one hand without pinching, twisting or tightly grasping, and mounted between 34” – 48” above the finished floor.
Door Operation – Door handles should require less than 5 lbs. of force to push or pull open.
For a more detailed explanation of door and door handle requirements, see sidebars Opening Doors and Get A Handle On It! To assist with ADA restroom design, each sidebar also includes corresponding product information from ADA product manufacturers.
Toilets
 Toilet Depth – Wall-hung toilets should have a depth of 56”, while floor-mounted toilets should have a depth of 59”.
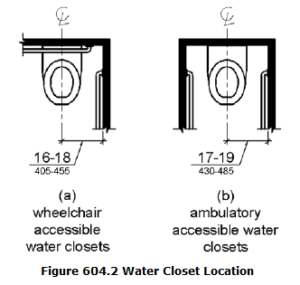
Toilet Seat Height – The top of the toilet seat should be installed at a height of 17” – 19” above the finished floor and 16” – 18” away from the sidewall to the centerline of the toilet.
Toilet Seats – Toilet seats cannot be spring-loaded to return automatically to an upright position.
Flush Controls – Flush controls can be manual or automatic. Manual flush levers (if present) must be placed on the open or accessible side of the toilet, which may be on the left or right, depending on the stall design and should require less than 5 lbs. of force to operate. Center, push-button, trip levers are not ADA compliant.
| Advisory Specifications for Toilets Serving Children Ages 3 through 12 | |||
| Ages 3 and 4 | Ages 5 through 8 | Ages 9 through 12 | |
| Water Closet Centerline | 12” | 12” to 15” | 15” to 18” |
| Toilet Seat Height | 11” to 12” | 12” to 15” | 15” to 17” |
Note: Wheelchair accessible compartments for children’s use shall be 60” wide minimum measured perpendicular to the side wall, and 59” deep minimum for wall hung and floor mounted toilets measured perpendicular to the rear wall.
For a more detailed explanation of toilet requirements, see sidebar The Toilet: Taking Care of Business. To assist with ADA restroom design, the sidebar also includes corresponding product information from ADA product manufacturers.
In-Stall Dispensers
Toilet Paper Dispenser – The toilet paper dispenser should be mounted so that the center of the dispenser is only 7” – 9” in front of the edge of the toilet bowl and unobstructed by the side bar. The opening for the toilet paper dispenser should be 15” – 19” above the finished floor. For an ADA stall, toilet paper dispensers that do not control or limit paper delivery are recommended to keep guests from needing to repeatedly reach for more paper.
Seat Cover Dispenser – Toilet seat cover dispenser should be 15” – 48” above the finished floor.
| Advisory Specifications for Toilets Serving Children Ages 3 through 12 | |||
| Ages 3 and 4 | Ages 5 through 8 | Ages 9 through 12 | |
| Dispenser Height | 14” | 14” to 17” | 17” to 19” |
For a more detailed explanation of in-stall dispenser requirements, see sidebar It’s in the Details: In-Stall Dispensers. To assist with ADA restroom design, the sidebar also includes corresponding product information from ADA product manufacturers.
Grab Bars
Properties – An ADA-compliant grab bar must be fully anchored and have a smooth surface that can be easily grabbed. The bar must be 1-1/4” to 1-1/2’” in diameter. Grab bars must have round edges and must return to the wall (or another anchor point) so there are no exposed ends. ADA-compliant grab bars must be securely anchored to the wall, be stationary in their brackets and be able to support 250 lbs. of force.
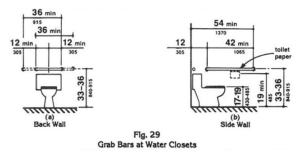 Placement – The stall must have two horizontal grab bars. One is located off the back wall (on the rear wall above the toilet) 33”-36” from the floor and floor and extending 1.5” away from the wall. Another grab bar 42” length is also used at 33”-36” from the floor off the wall on the side or partition closest to the toilet. A third 18” vertical grab bar may also be added above the grab bar on the side wall.
| Advisory Specifications for Toilets Serving Children Ages 3 through 12 | |||
| Ages 3 and 4 | Ages 5 through 8 | Ages 9 through 12 | |
| Grab Bar Height | 18” to 20” | 20” to 25” | 25” to 27” |
For a more detailed explanation of toilet stall grab bar requirements, see sidebar Get a Grip On Grab Bars for Water Closets. To assist with ADA restroom design, the sidebar also includes corresponding product information from ADA product manufacturers.
Urinals
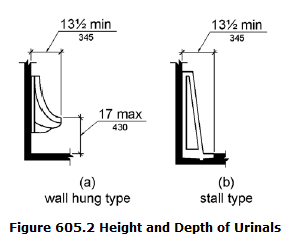 Placement – The rim of an ADA compliant urinal must be a maximum of 17” above the finished floor.
Depth – Urinals should have a minimum depth of 13.5” from the wall to the outer rim of the bowl.
Flush controls – Flush controls can be manual or automatic operation. Manual controls must be at maximum 48” above the finished floor and should require less than 5 lbs. of force to operate.
Floor space – There should be a clear floor space of 30” x 48” in front of the urinal to allow for a forward approach.
For a more detailed explanation of urinal requirements, see sidebar A “Stand Up” Fixture. To assist with ADA restroom design, the sidebar also includes corresponding product information from ADA product manufacturers.
Lavatory Requirements
Sinks
 Requirement – There should be at least one sink in the restroom that meets ADA requirements.
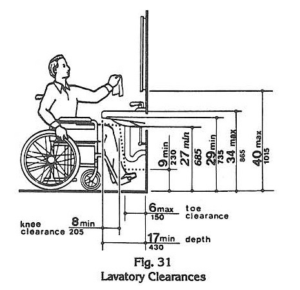
Placement – Sinks must be installed with enough clearance underneath for a person in a wheelchair to be able to reach the faucets. The sink basin should be a maximum of 34” above the finished floor, leaving a knee clearance of 27” high, 30” wide, and 11” – 25” deep. Countertop sinks should be installed as close to the edge as possible to allow for easy access.
Height – The disabled should have 9” in height and 17” – 25” in depth of toe clearance without hitting any plumbing.
Exposed Plumbing – Any exposed plumbing should be insulated and padded to prevent any injuries to a person’s legs. A protective panel can be installed to block off the plumbing but must still allow for 8” deep of knee clearance and 11” deep of toe clearance with a 9” height.
| Children’s Reach Ranges | |||
| Forward or Side Reach | Ages 3 and 4 | Ages 5 through 8 | Ages 9 through 12 |
| High (maximum) | 36” | 40” | 44” |
| Low (minimum) | 20” | 18” | 16” |
| Advisory Clearance Specifications for Children Ages 3 through 12 | ||
| Ages 5 and under | Ages 6 through 12 | |
| Knee Clearance | parallel approach | 24” |
| Toe Clearance | 12″ minimum | |
For a more detailed explanation of restroom sink requirements, see sidebar Everything and the Bathroom Sink. To assist with ADA restroom design, the sidebar also includes corresponding product information from ADA product manufacturers.
Faucets
Operation – Faucets can be lever operated, push, touch, or electronically controlled. They should be usable with one hand without the need to tightly grasp, pinch, or twist the wrist. Users should be able to turn the lever with no more than 5 lbs. of force.
Depth – The reach depth to the faucet must not exceed 11”.
| Children’s Reach Ranges | |||
| Forward or Side Reach | Ages 3 and 4 | Ages 5 through 8 | Ages 9 through 12 |
| High (maximum) | 36” | 40” | 44” |
| Low (minimum) | 20” | 18” | 16” |
For a more detailed explanation of faucet requirements, see sidebar “Turning On” Accessible Faucet Design. To assist with ADA restroom design, each sidebar also includes corresponding product information from ADA product manufacturers.
Soap Dispensers
Placement – Can be manual or automatic. Soap dispensers should be mounted no higher than 44” above the floor. Customers should be able to simultaneously use soap dispensers and faucets without interference.
Operation – Manual soap dispenser button should be used with one hand and should not require over 5 lbs. of pressure to activate it.
| Children’s Reach Ranges | |||
| Forward or Side Reach | Ages 3 and 4 | Ages 5 through 8 | Ages 9 through 12 |
| High (maximum) | 36” | 40” | 44” |
| Low (minimum) | 20” | 18” | 16” |
For a more detailed explanation of soap dispenser requirements, see sidebar Grasp Should Exceed Reach. To assist with ADA restroom design, the sidebar also includes corresponding product information from ADA product manufacturers.
Mirrors
Placement – The bottom edge of the reflective surface of a mirror located above a sink should measure 40” maximum above the finished floor. If the mirror is not above a sink or countertop, it should be located 35” above the finished floor.
Safety – Mirrors should not have any exposed edges that may lead to injury.
For a more detailed explanation of mirror requirements, see sidebar Mirror, Mirror On the Wall. To assist with ADA restroom design, the sidebar also includes corresponding product information from ADA product manufacturers.
Hand Drying
Hands Free – Hand dryers and towel dispensers should allow for left-hand and right-hand approaches. If the unit does not allow for both, one of each type is recommended.
Placement – Hand dryers should be mounted between 40”- 48” above the finished floor and cannot extend beyond 4” from the wall. If using a paper towel dispenser, the opening should be at a maximum of 48” above the finished floor.
Clearing – A clearing of 30” x 48” should be provided in front of the hand dryer to allow for a forward approach.
| Children’s Reach Ranges | |||
| Forward or Side Reach | Ages 3 and 4 | Ages 5 through 8 | Ages 9 through 12 |
| High (maximum) | 36” | 40” | 44” |
| Low (minimum) | 20” | 18” | 16” |
For a more detailed explanation of hand drying requirements, see sidebars Drying Hands Matter: The Paper Towel Dispenser and Integrating Hand Dryers into ADA Restrooms. To assist with ADA restroom design, each sidebar also includes corresponding product information from ADA product manufacturers.
Trash Disposal
Trash Receptacle – A trash receptacle should be out of pathways and not placed in front of sinks, handrails, hand dryers or paper towel dispensers.
Placement – Recessed trash disposal units should not project more than 4” from the wall and should be mounted with the opening at 27” above the finished floor.
For a more detailed explanation of door and door handle requirements, see sidebar Talking Trash. To assist with ADA restroom design, the sidebar also includes corresponding product information from ADA product manufacturers.
Showers
The ADA guidelines indicate that showers must have certain clear INSIDE dimensions, but there are two acceptable styles.
Transfer Shower
Size – An ADA Transfer Shower must have an inside dimension of 36” x 36” with a seat and grab bars and more specifically adhering to the following:
- Must be 36” from center points of opposing sides-no construction tolerance is stated in the code
- Must be 36” from the back wall to the outside of the shower on the wall the seat is mounted on – no construction tolerance is stated in the code
- 36” minimum opening at the entry of the shower from the top to floor
- Clearance of 36” wide minimum by 48” long minimum measured from the control wall

Grab Bars – ANSI calls for vertical grab bar on control wall. Back wall grab bar to extend 18” from control wall; 1.25” To 1.5” diameter, 250 lbs. load rated, not to be placed above seat; mounted at same height where multiple bars used, 33”-36” above finish floor and no more than 6” from adjacent wall.
For a more detailed explanation of shower grab bar requirements, see sidebar Get a Grip On Grab Bars for Showers. To assist with ADA restroom design, the sidebar also includes corresponding product information from ADA product manufacturers.
Seat – L-shaped seats placed no more than 3” from front entry and may be folding or non-folding; 250 lbs. load rated; mounted 17”-19” above bathroom finish floor; distance from seat wall to back edge, 2.5” max, to front edge 15”-16”; distance from adjacent wall no more than 1.5”; L-shaped seats to extend 14”-15” from adjacent wall.
For a more detailed explanation of shower seat requirements, see sidebar Take an (Accessible) Seat. To assist with ADA restroom design, the sidebar also includes corresponding product information from ADA product manufacturers.
Shower Head – The controls, faucets, and shower spray unit shall be installed on the side wall opposite the seat 38” – 48” maximum above the shower floor and shall be located on the control wall 15” maximum from the centerline of the seat toward the shower opening. Users should be able to turn the lever with no more than 5 lbs. of force.
For a more detailed explanation of shower head requirements, see sidebar ADA Shower Heads – You’re in Control. To assist with ADA restroom design, the sidebar also includes corresponding product information from ADA product manufacturers.
Roll in Shower
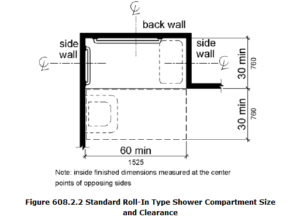 Size – An ADA Roll in Shower must be at least 60” x 30” inside dimension.
- Must be minimum 60” x 30” from center points of opposing sides
- 60” minimum opening from top to bottom
- Clearance of 30” wide minimum by 60” long minimum adjacent to opening
Seat – ANSI calls for seat to be provided, optional for ADA. Folding seat placed on side wall no more than 3” from front entry. Same criteria as Transfer Shower Seat.
Grab Bars – Back wall grab bar to extend 18” from control wall
Shower Head – The controls, faucets, and shower spray unit shall be located above the grab bar, but no higher than 48” above the shower floor. Where a seat is provided, the controls, faucets, and shower spray unit shall be installed on the back wall adjacent to the seat wall and shall be located 27” maximum from the seat wall. Users should be able to turn the lever with no more than 5 lbs. of force.
Shower Ramps
Should a change in level be greater than 0.5” and less than 3”, ramps not steeper than 1:8 may be used in existing sites, buildings, and facilities where such slopes are necessary due to space limitations.
For a more detailed explanation of shower requirements, see sidebar Accessible Showers. To assist with ADA restroom design, the sidebar also includes corresponding product information from ADA product manufacturers.
For more information on the 2010 ADA Standards (Chapter 6), explore the standards here.
Additional topics of interest may include:
Aging in Place Legislation Going on Now
Aging in place design: what you need to know for marketing
Note: All images are sources from the 2010 ADA Standards.